The Wifi Caravan Monitor


So after looking around the local Anaconda on the weekend I came across a Bluetooth battery monitor the BM Pro which I thought was a great idea. Then I glanced at the price tag… $250.99 AUD and thought there’s no way I couldn’t make a similar system myself.  I’ve already got a microcontroller to play with (Arduino Uno) that I haven’t used in anything.  Surely I’d just need to measure the voltage – Process is somehow and send it out over Bluetooth to a connected device.  Then the part I don’t know how to do – Program an android app to display that info.

From that simple seed of inspiration, I had another eureka moment.  I’ve already got the van router so why would I both using Bluetooth.  Let’s send information around the van from various sensors via wifi and have the router do the processing.  Then all I’d need is a nice little web page that I could go to on any connected device with a web browser.

From there as with all my projects scope started becoming a problem as my brain kicks into gear and thinks “So we’ll check the voltage this way… ohh squirrel … I can do this, and I can also do that”.  So let define what we’re playing with its capabilities and then what the actual monitor can do for us.

Arduino Uno Specs:

Microcontroller ATmega328P
Operating Voltage 5V
Input Voltage (recommended) 7-12V
Input Voltage (limit) 6-20V
Digital I/O Pins 14 (of which 6 provide PWM output)
PWM Digital I/O Pins 6
Analog Input Pins 6
DC Current per I/O Pin 20 mA
DC Current for 3.3V Pin 50 mA
Flash Memory 32 KB (ATmega328P)
of which 0.5 KB used by bootloader
SRAM 2 KB (ATmega328P)
EEPROM 1 KB (ATmega328P)
Clock Speed 16 MHz
LED_BUILTIN 13
Length 68.6 mm
Width 53.4 mm
Weight 25 g

So from that, we can see 14 digital pins and 6 analogue pins.  Essentially if we think of the digital pins as a way to turn circuits on and off (1 or 0) and the analogue pins as a way to read in values such as battery voltage we can monitor 6 devices which in my case (at this stage of thinking) was enough.

The caravan monitor would need to be able to do the following:

  • Run from 12volts
  • Measure the battery voltage
  • Measure the power use (In amps) at any given time
  • Give an approximate state of charge level (percentage charged) of the battery bank
  • Measure two water tank levels
  • Measure gas bottle levels
  • Communicate with the van router over wifi

Now that we’ve defined what it will do.  How will we achieve this… simple really.

Figuring I’d start with the most basic thing on the list of wants – BATTERY VOLTAGE.

The Arduino uses an analogue to digital converter with a max input of 5V so we need a way to translate the possible max of say 15V down to 5V. We do that with the aid of a resistive voltage divider.  Not going into the details i settled on some resistor values based on what i had laying around and got to work on the code.

Essentially the code was this:

int VoltageReadPin = A0; // arduino pin our RVD sense pin is on
int sum = 0; // sum of samples taken
unsigned char sample_count = 0; // current sample number
float voltage = 0.00; // initilise voltage variable
// Setup Voltage Divider Resistors
int resistor1 = 5000;
int resistor2 = 1000;
float arduinovoltage = 4.95;

void setup()
{
 pinMode(VoltageReadPin, INPUT);
}

void loop()
{
 while (sample_count < 3) {
 sum += analogRead(VoltageReadPin);
 sample_count++;
 }

 // calculate the voltage
 // use 5.0 for a 5.0V ADC reference voltage
 // 5.015V is the calibrated reference voltage
 voltage = ((float)sum / (float)3 * arduinovoltage) / 1024.0;
 // Divide calculated voltage by RVD factor - Vin/Vout = 6.96V in our example
 voltage = (voltage * 6.77);


 sum = 0;
 sample_count = 0;

 Serial.print(F("Voltage: ")); Serial.println(String(voltage).c_str());
}

Forgive me if the code no longer works I had to do it from memory as the project has long since progressed to something bigger.

So that gets us the voltage and prints it out to the computer via USB/serial – Now we need to send it to the router/network.  After a few ideas of using a web page etc I stumbled on an article relating to MQTT from hiveMQ.

Essentially MQTT allows for very simple comms over a network and there already exists iPhone and Android apps to work with it…. YIPEE I still don’t have to learn to program for phones.

Now we have two problems – getting the Arduino onto wifi and sending MQTT data

I’d seen a lot of press about a small cheap wifi chip named the esp8266 for less than $10 you could add wifi to your projects hell you could do away with the Arduino all together and just use the esp if you wanted (I needed more than 1 analogue pin). I jumped on eBay and ordered 3 of them.  Only need one for the project but come on – for $6 i can wifi enable anything i like.  lol

Chip arrives – I wire it up, it springs to life – Using a USB to serial converter i can send it AT type commands and make it connect to the van router and ping things etc.  OK.  now how to get the Arduino to talk to my wifi network using this thing.

OK now how to get it work with the Arduino – Turns out really easily.  There’s a library wifiESP that takes care of the legwork for us.  We make a few config lines in our Arduino sketch to tell it what pins the esp is on and it takes care of the rest.  One problem down one to go.

MQTT is just as simple – There’s a library called PubSubClient which we can utilise to publish and subscribe to topics.

TO BE CONTINUED…..

OpenWrt Mysql-Server Install

opkg update
opkg install mysql-server
/usr/bin/mysqld –skip-grant-tables&
mysql -uroot

SET PASSWORD FOR root@’localhost’ = PASSWORD(‘password’);

UPDATE mysql.user SET Password=PASSWORD(‘newpwd’) WHERE User=’root’;

FLUSH PRIVILEGES;
exit
ps |grep mysqld
kill PIDNUMBEROFMYSQL
/etc/init.d/mysqld start

Quicker and simpler wifi check

So I needed a way on bootup to see if I was connected to the home wifi or not.


Figured when i’m away from home I wont be able to “see” the home network so why not just test to see if its in range on bootup, and if its not assume we’re out enjoying the great outdoors and disable the home network.  This means I can have the router enable the Access Point rather than work as a bridge when i’m home

Create a new file: nano /usb/sbin/wificheck.sh

put this in the file

uci set wireless.@wifi-iface[0].disabled=0
uci commit wireless
wifi

sleep 5
if iw dev wlan0 scan| grep -qi NETWORKNAMEHERE; then
logger “Home network found (NETWORKNAME), leaving network online”
else
logger “Away from Home – Disabling home wifi”
uci set wireless.@wifi-iface[0].disabled=1
uci commit wireless;
wifi
fi

save the file

then run chmod +x /usb/sbin/wificheck.sh

nano /etc/rc.local

add the line

/usr/sbin/wificheck.sh

save the file

reboot

Van Router – Auto Connect to Home Network

1413825786_thumb.jpegSo I’ve been wrestling with a way to have the van router automagically connect to the home wifi network when ever its turned in at home.

Obviously I could simply setup the router as both a client to connect to the home network and access point to enable devices to connect to the van router. This works fine whilst I’m at home. The minute the router cant find the home network (For example when traveling) and it simply kills wifi from ever starting up meaning devices cant connect to router.

After searching the web, I’ve managed to find a very clever solution that i dont understand why I didnt think of myself. So elegant and yet so simple.  Now I didn’t come up with the script.  I simply plagerised it from here

On startup… Have the router try and download the google.com page, if of course this works it means we’re at home and the home network is obviously avaiable. Therefor leave it enabled.

If we try the download and it fails – Obviously the home network is not available and as such it should be disabled. Its this disabling of the home network settings that then enables the router to continue start up wifi.

so heres what we do:

1st we create our wifi-check.sh file

vi /usr/bin/wifi-check.sh

in this file we paste the following

#wifi-check.sh
#!/bin/sh

# test both networks.

logger “Enabling home wifi network for uplink test”

uci set wireless.@wifi-iface[1].disabled=0;
uci commit wireless;
wifi

# wait some time and test
sleep 15
rm index.html
logger “Testing uplink state….”
if wget http://google.com; then

logger “You have uplink, Leaving network alone.”

# disable uplink wifi and restart if no connection is available
else

uci set wireless.@wifi-iface[1].disabled=1;
logger “No uplink available, Disabled home network
uci commit wireless;
wifi
fi

save this file.

now we change the file permissions.. being i’m lazy i did it this way as the router doesn’t need to be super secure. I mean come on I use it for camping.. lol

chmod 777 /usr/bin/wifi-check.sh

next we edit rc.local to enable the script to run on bootup

vi /etc/rc.local

add the following line before the exit 0 statement

wifi-check.sh &

Save the file and reboot.

You should have access to your home network. Now turn off the home wifi router and reboot your van router. You should find that after an extra 15 seconds than normal, you will have wifi available.

This is super awesome as it means we now have way to automate backup of home files to the van router when it becomes available at home. On successful uplink test we could theoretically then start an rbackup of say a movie folder. The skys the limit.


Actually I’ve just had a thought.  If we start the connection at home, and then drive away do things mess up.  Rather than rebooting – What if the wps button could toggle the home wifi network on and off, that might be even easier…

I’ll do some fudging around and see what I come up with….. Stay tuned

TPLink – WR703N… The caravan router

So, now that we’ve purchased our first caravan and progressed from caping to glamping with all the mod cons (Well the ones I can afford) it was decided between the brains trust at work, that being able to take away the entire movie library so the kids could watch anything they liked as we drove along, or if heaven forbid bad weather hits us, it will be just like being at home.

So what do we need this magical box to do

1. Provide wifi access whilst travailing in the vehicle as well as when camped

2. Provide windows file sharing of media to allow devices running xvmc or other software to access the media

3. Possibly run some sort of DLNA type server to stream media to devices that can’t access SMB shares directly

4. Possibly provide a bridge between my phones next-g connection and wifi only devices such as iPads/iPods (Not implemented yet as not required)

Things required:

* OpenWRT Firmware (Atitude Adjustment at the time of writing)

* TP-Link WR703N

* USB HDD (To store both the routers O/S as well as media files)

* Ethernet Cable

* 1Amp Cigarette Power Adapter for the car

Lets get it done:

Pre-reqs:

Partition the HDD. 

For this you will need to create three separate partitions

  • 2 small 1GB partitions in EXT4 format
  • the rest of the drive should be partitioned as NTFS

The size of the ext4 partitions was chosen as this allowed ample room for messing around with openwrt, whilst when considering scale, a few gb out of a tb doesn’t really lend itself to being noticed.

NTFS was chosen as the other fs type as this will mean when the HDD is plugged into a windows machine to copy moves etc to it, the ext4 parts by default will be invisible and only the ntfs partition will be visible (Protection by obfuscation)

How you partition your drive is up to you, I used an existing linux box, however gparted can be downloaded and used to do it from a usb key.  Windows on its own doesn’t work as you can’t format ext4 partitions.  Once you get comfortable with it, you can actually do the partitioning with openwrt, this will not be covered in this guide.

The Main Event

Connect your computer to the 703N via ethernet as I don’t trust using wifi to do a firmware upgrade

The 703N will more than likely come pre-installed with Chinese language firmware.  So the first hurdle is trying to work out how to flash OpenWRT to the router in the first place.

So to do this we open http://192.168.1.1 in our favourite web browser

Click the very bottom option

LastOption

Then select the third option down

Thirdoption

Click the button labeled 1. and select the openwrt firmware you downloaded.  Then press the button i’ve labeled 2.

Upload

After a few minutes the file will be uploaded in the router, and it will begin to reboot.

On reboot you may need to statically set the ip address of your network card.  Configure them to match the settings I have listed here and your should be able to ping the router once its blue light stops flashing indicating it has booted up

Network

Now we need to setup a password to allow us to ssh into the router.

Open your browser and connect to the router at its default address (usually 192.168.1.1). Login using username root with an empty password.

Make sure your browser accepts (session) cookies. LuCI login fails if password is set and session cookies cannot be accessed.

Then click on the left in the top bar on Administration, then go to System in the bar underneath. A page to change the password is displayed.

Write your desired password into the field Password and repeat it in the field Confirmation. Finally click on Save & Apply.

Your password is set now.

Next we ssh into the router (on mac enter ssh root@192.168.1.1 into a terminal windows)(on windows again use Putty select SSH from the connection type and enter root@192.168.1.1 as the host) you will be asked to enter the password, type it in and press enter.

Now we’ve set the admin password and logged in via ssh its time to enable wifi. (Plagirised from the openwrt wiki)

vi /etc/config/network

then press i to enter insert mode

config interface ‘wan'
option ifname ‘wlan0'
option proto ‘dhcp'

now press esc and then enter :wq this will save and quit VI

now we need to configure our existing network

vi /etc/config/wireless

again enter insert mode by press i

now you need to enter the details that will match your existing wifi network to allow you to connect this box

config wifi-iface
option device radio0
option network wan
option mode sta
option ssid ‘’’yournetworksssid’''
option encyption psk
option key ‘’’yournetworkkeyhere’''

To configure other network types visit the page here for further reading.

now that we’ve connected our device to the internet its time to actually install some software.  The package monitor in openwrt is opkg.  Easy to use

so in our ssh sessions we type in:

opkg update

this will download a list of up to date packages ready for us to install

opkg install luci
/etc/init.d/uhttpd enable
/etc/initi.d/uhttpd start

You should now be able to visit 192.168.1.1 in your browser and be greeted with the OpenWRT main login page

this will give us a pretty web interface to do much of our configuration

now that we’ve install Luci we’ll also want to at this point install extroot.

EXTROOT essentially allows us to utilise space on another device such as a hdd or usb key and make it appear to the router as if it is its own internal flash rom.

EXTroot requires we get our USB HDD recognised .  Very simple to do.

#update available packages
opkg update
#Install needed filesystem support
opkg install kmod-usb-storage kmod-fs-ext4 block-mount

# Now to copy the required files to the usb hdd that will become our overlay

mkdir -p /mnt/sda1
mount /dev/sda1 /mnt/sda1
mkdir -p /tmp/cproot
mount --bind / /tmp/cproot
tar -C /tmp/cproot -cvf - . | tar -C /mnt/sda1 -xf -
umount /tmp/cproot
umount /mnt/sda1

Now we need to tell openwrt using stab how and where to mount the partition

vi /etc/config/fstab

make the following changes

#old
option target /home
option enabled 0
#new
option target /
option enabled 1

press the esc key and then press : and enter wq

now enter the following:

reboot

after rebooting the machine ssh back into the box and enter the following

df

you should see rootfs size now matches that of the partition we created

Thats it done.  Our router is now using the attached USB HDD as its main storage. If we boot the router without the HDD attached it will use its own internal flash as storage.  This essentially means we can have a failsafe configuration if we screw something up on the USB HDD, we remove the drive, reboot the router and BOOM we’re back in.

Now you can go ahead and install what ever you like to the drive.  For us thats samba, and in an upcoming project dlna for those that don’t utilise XBMC


opkg update
opkg install luci-app-samba block-mount nano fdisk ntfs-3g

Configure the samba mount points as required, sit back, grab a cold one and be done iwth it.

For the next project I’m looking at recompiling OpenWrt with the required packages already built in. I’ve had success building in most if not all the required apps just need to bundle config files to make setup alot more rapid should something go wrong in the future.

Configure Ubuntu to update NameCheap Dynamic DNS

First we install the client:
Sudo apt-get install ddclient

Then we need to change the contents of the ddclient.conf file to:

Sudo nano /etc/ddclient
############
# ddclient.conf
# namecheap
############
## update time in seconds, i believe
daemon=300
## you can open this file with any text editor to see what is being sent
cache=/tmp/ddclient.cache
pid=/var/run/ddclient.pid
## This line will get your public IP address if you're system is not directly connected
## to the internet, such as behind a firewall/router
use=web, web=http://whatismyipaddress.com/, web-skip='Your IP address is'
protocol=namecheap
server=dynamicdns.park-your-domain.com
## Your Domain name
login=example.com
password='#namecheap provides this - leave quotes'
ssl=yes
## this was the tricky part for me to figure out
## I was embarrassed with myself when I learned how easy it was
## separate each sub-domain you want to update with the IP address with a comma then space
@, forum, img, ssl, tracker, webmail, www

Thats about it.. just add ddclient to startup with your pc

sudo update-rc.d ddclient defaults
sudo update-rc.d ddclient enable

Thats all there is to it. To check if the updates have occured we can use

sudo /tmp/ddclient.cache

to see if there's been any updates and if they were successful. Hope that helps 🙂

How to automatically download TV Shows using bit torrent

This ones a pretty quick post just to go over the basics.

Steps involved:

1. Install uTorrent

You can download utorrent from www.utorrent.com

Simply download and install like any other app.  Be careful not to install the bloatware that comes with it (There’s tick boxes during the install.

2. Configure RSS Feeds for TV Shows

There are a few feeds you can add.  The two main ones are:

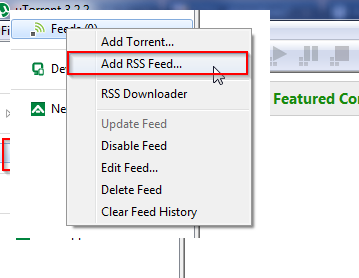
To add these to utorrent – Right click on feeds on the left hand side and in the box displayed paste in one of the above links and press ok.  You can repeat this step a number of times to add both or more if you find them.

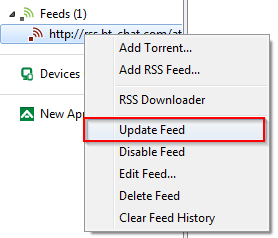
3. Right click on feeds on the left and select update feed.

4. Once the list of shows currently in the list populates, right click on a favorite and select add to favorites.  This will then present another dialogue box where you can fine tune some settings.  Typically changing the show name to remove the release group is a good idea and replacing spaces with question marks works as well as an asterisk at the end of the show name.  for example NCIS LA S01E01 would change to NCIS?LA*

After about a week of monitoring the feed you will have a list of favorites and your tv shows will become a set and forget type of affair.

As always, any questions, feel free to ask.

Cheers

Getting NCID working on every device possible

So this weekend I decided it was time to resurrect some of the old caller-id scripts I used to utilise.  Previously I had used YAC as my caller-id server and listener on a windows pc, and used a python script on XBMC to display the caller ID on the old xboxes I used as media centres.Due to the latest version of XBMC (EDEN) the older scripts no longer function.  The next problem is I no longer use a windows machine anywhere near a telephone point.  There is however a linux server running right next to a telephone point I could hook an old external modem to and utilise that way.

After some research online, I found there was a package called NCID (network caller-id) that would happily monitor the responses from a serial modem and broadcast the caller-id information around my network.

In the interest of squeezing every last bit of usage from my new iPhone I also decided I needed to be able to send CID info to my phone via something like growl etc.

So now that we know all that, the software want list looks like this:

  • Ubuntu Linux Box
  • Windows YAC listener
  • Some kind of push notification app for the iPhone
  • NCID client for OSX so we can see the popup info on our Macbook
  • A python script to install on the Apple TV’s I have replaced old xboxes with.

So for the Ubuntu linux box – That’s already setup and working as an sql server for sharing the media database between multiple xbmc clients

  • We also need a serial modem that supports Caller-ID AT Commands.. Just so happens I have a netcomm roadster (Used to be US Robotics)

Windows YAC client is easy.  We simply download the package from: http://sunflowerhead.com/software/yac/

Push notifications to the iPhone was a little more complex.  Originally I was going to use Prowl and have the ubuntu box push the information out using that.  However being a “thrifty” fellow (RE: TIGHTARSE) I decided to use boxcar as my app of choice.  For those that don’t know, boxcar is used to push a number of different notifications to your iPhone via push messaging.  Things like twitter updates, Facebook, and all sorts of other services.  The beauty of box car is you can setup your own “Service” using their API and have custom icons etc assigned to that service.  Otherwise you can simply do it with your own username and password, and skip the pretty icons.  Boxcar will interpret your messages as Growl notifications and still display them on your iPhone.  You can read more about boxcar and get the app from: http://boxcar.io/

Finally a way to push the information to XBMC running on any platform.  xbmc now ships with a command called “xbmc-send” which can be used to send JSON-RPC commands to XBMC clients on your network.  Rather than re-invent the wheel I decided to use this as a way to popup the notification box that displays the CID information.  On the main AppleTV i’ve also used that same command to pause the video on an incoming call.

So lets finally get down to business.

Windows Setup

Download the Yac client from the above listed website, and install it on your windows machine.

Once install head over to your start menu and run the Yac Listener application.

At this point, if you right click and drag the listener app from the yac item of your start menu into the startup item, the listener will run each time windows start up and you’re logged in.

Ubuntu Server Setup

First we need to download the ncid package.  For me, this wasn’t already available from the repo’s I had setup, so i had to setup repos using the following commands:

wget -q -O - http://archive.getdeb.net/getdeb-archive.key | sudo apt-key add -sudo sh -c 'echo "deb http://archive.getdeb.net/ubuntu precise-getdeb apps" >> /etc/apt/sources.list.d/getdeb.list'

once thats done we run:

sudo apt-get update
sudo apt-get install ncid

This will install both the ncid Server and the ncid-client which we will need to send info to xbmc and to our iPhone.

The next step is to configure NCID to actually utilise the modem.

next we enter:

sudo nano /etc/ncid/ncidd.conf

Search (CTRL+W) for the line that states:

# Set noserial = 1

and change it to

Set noserial = 0

Save the file (CTRL+O) and then exit nano (CTRL+X)

Now we need to edit the ncidmodules.conf file to send cid info to our yac listeners

sudo nano /etc/ncid/ncidmodules.conf

Search for YACLIST=”127.0.0.1″ and change it to the ip address of your windows computer.  IE: YACLIST=”192.168.0.XXX”

Save and close this file as we’re now done with it.

Next we need to create a script that will handle the notifications for us.  I decided to add all my custom notifiers into the one file, however you could launch separate processes for each notification (Now that I think of it, I’ll try that next :D)

sudo nano /etc/ncid/ncid-prowl

Copy and paste the following in as your script

# !/bin/sh
 # ncid-prowl output module
 # Modify as needed for new module
 # kiip "ncid-" in the name
 # input is 5 lines obtained from ncid
 # input: DATEnTIMEnNUMBERnNAMEnLINEn #
 # input is 5 lines if a message was sent
 # input: nnnMESSAGEnn
 # Message will be in $CIDNAME#
 # ncid usage:
 # ncid --nogui [--message] --program ncid-prowl

ConfigDir=/etc/ncid
 ConfigFile=$ConfigDir/ncidmodules.conf

[-f $ConfigFile ] && .$ConfigFile

read CIDDATE
 read CIDTIME
 read CIDNMBR
 read CIDNAME
 read CIDLINE

# Test to see if the number has an alias assigned to it - or if ncid is unaware who owns this number
 # If there is an alias assigned - push this value to the T1 variable, otherwise set T1 to the number of the incomming call

if [ "$CIDNAME" = "NO NAME" ];
 then T1=$CIDNMBR
 else T1=$CIDNAME
 fi

##############################
 # Send notifications to XBMC #
 ##############################

# Send notification without pausing currently playing item - Uncomment if you dont want a pause
 # xbmc-send --host=IPOFXMBC -a "Notification(Incomming Call,Call From $T1)"

# Send noticiation and PAUSE the currently playing item - Comment if you dont want a pause
 xbmc-send --host=IPOFXBMC -a "Pause"
 xbmc-send --host=IPOFXBMC -a "Notification(Incomming Call,Call From $T1)"

###############################
 # Send noticiations to boxcar #
 ###############################

# Replace UN with your boxcar username(email address)
 # Replace PA with your boxcar password

/usr/bin/curl -d "notification[from_screen_name]=Incoming Call" -d "notification[message]=Call From: $T1" -user "un:pa" <a href="https://boxcar.io/notifications">https://boxcar.io/notifications</a>

exit 0

Save and close nano with this new script

next we make it executable

sudo chmod +x /etc/ncid/ncid-prowl

Now that we’ve got all that setup we need to set the ncid client and the ncidd daemon to start on startup

sudo update-rc.d ncidd defaults

now to create a scrip that will start ncid and push the notifications to our ncid-prowl script.

sudo nano /etc/init.d/start-ncid.sh
#!/bin/bash

ncid --no-gui --program /etc/ncid/ncid-prowl &

Save and close the script

now we need to make it executable

sudo chmod +x /etc/init.d/start-ncid.sh[/code[

then add it to the default startup items

sudo update-rc.d start-ncid.sh defaults

reboot the box with

sudo shutdown -r now

and on reboot your caller id should be working without a problem

if you want to have peoples names appear instead of simply their numbers (For known callers) simply edit the file /etc/ncid/ncidd.alias file and follow the comments in the file.

Mac Setup

To have the notifications sent to your mac download and install a program called NCIDPop.  Don't bother turning on growl notifications as they don't work with the latest version of growl.

So after all that.. you finally have NCID setup and sending Caller-ID info to as many devices as possible. And all for free 😀

Enjoy!

UPDATE: After mucking around with this some more, I decided to go ahead and split the xbmc and boxcar notifications into different scripts.

The advantage of this is that now my iphone is alerted at almost the exact same time as xbmc.  So in the interest of speed I created a second script.  All thats required is to copy the entire ncid-prowl script and edit it a little to remove the xbmc notification part.  We do the same for ncid-prowl by removing the boxcar part

sudo cp /etc/ncid/ncid-prowl /etc/ncid/ncid-boxcar
sudo nano /etc/ncid/ncid-prowl

Delete the lines related to boxcar notifications then close and save this file

sudo nano /etc/ncid/ncid-boxcar

Delete the lines related to xbmc notifications, then close and save this file.

Make the ncid-boxcar script executable (I think it already is as we copied it, however just in case)

sudo chmod +x /etc/ncid/ncid-boxcar

next we need to update the /etc/init.d/start-ncid.sh script file to run a second instance of ncid.  From the documentation it's stated we can run as many instances of ncid as we like/require so we simply add another line to enable our boxcar script

sudo nano /etc/init.d/start-ncid.sh

add the following line under the first line that starts our xbmc script:

ncid --no-gui --program /etc/ncid/ncid-boxcar &

close and save this file and kill any running ncid processes

sudo ps -aux |grep ncid

once you identify the process ID for the running ncid issue

sudo kill -9 PROCESSNUMBER

then run

sudo /etc/init.d/start-ncid.sh

And enjoy your multiple instant alerts.

Next I'll look at integrating this into the main ncidd script.  Its already doing it for ncid-yac so I dont see why it can't run our scripts as well.

ENJOY!

UPDATE 18/04/12:

For those that want to do the same thing without the linux box and using windows to send to their xbmc machines (Thats any box running a current version of xbmc from Dharma up)

  1. Download and install YAC Server from http://sunflowerhead.com/software/yac/yac-0.16-win32.zip
  2. Once thats installed download this file: http://www.endpoint.eclipse.co.uk/wordpress/yac-0.17-win32.zip
  3. Extract that zip file to the same folder as your YAC installation and overwrite any files.  I pulled this file from here: http://mattcollinge.wordpress.com/2007/05/18/spoken-caller-id-using-yac/
  4. Download and install WGET into C:\windows\system32 or anywhere else in your command path.   http://gnuwin32.sourceforge.net/packages/wget.htm
  5. Edit the Yac-helper.cmd file to the following:
@echo off
02  
03 rem  ----------------------------------------------------------
04 rem  Matt Collinge :: www.mattcollinge.co.uk :: 17 April 2007
05 rem  ----------------------------------------------------------
06 rem  Helper Script for YAC 0.17. When present in the same 
07 rem  folder as "yac.exe" this will be run each time a call is 
08 rem  received. The type of data being passed through 
09 rem  in %2 &amp; %3 is specified in %1. 
10 rem  
11 rem    %1 = ( call | message )
12 rem    %2 = either the calling number or text-based message
13 rem    %3 = the calling name (not set for a text-based message)
14 rem  ----------------------------------------------------------
15  
16 rem This next line simply passes the parameters on to a piece of VBScript. But you can
17 rem modify this line to call any app you like :)
18  

Edit line 19's username/password to match what you have setup in xbmc, and ensure you enable all the options in xbmc network services.  Not only will this help this script to work, but lets you do some pretty funky stuff with your xbmc machine 😀

You can also use the same principal to adapt the boxcar notification stuff into windows as well.

I haven't been able to test this script as I dont have a windows machine thats running yac server.  Give it a go and if it doesn't work I'm happy to take suggestions that do make it work.

There is another solution to this though:  http://forum.xbmc.org/showthread.php?tid=105931 There they edit the .vbs script and make changes in there to get things happening.  In saying that, I don't see the point to do this when the solution is so elegantly simple

So there you have it, a linux and windows solution.  AND YES YOU CAN DO IT ON A MAC.. you'd use NCID and automater.

Sichtschutz, Screen Protection For Your Windows Desktop

Sometimes you may want to hide what is showing on your desktop, for instance if you notice that someone is going to walk by or approach you in office. You probably would not like your boss to find out that you are playing games during work hours, or your wife that you are shopping at the expensive jewelry store for a gift for her upcoming birthday.

While simply turning off the monitor hides the contents of the desktop, it is at the same time a dead giveaway that you are hiding something.

The portable application Sichtschutz offers an alternative. Sichtschutz, which means screen protection in this context, offers boss-key like functionality. It can quickly display an image on the screen that overshadows the actual computer desktop with its open windows and programs.

sichtschutz

You need to select an image from your local system on first start. You can alternatively press the print key on the keyboard to use a snapshot of the desktop as the image that is shown when the program is activated.

This can be handy as it makes the screen look like the standard desktop when in fact it may be not. Just take a screenshot with programs open that do not cause suspicion.

The configuration menu lists additional settings to set the image alignment to stretch, center or tile, to mute sounds and to automatically log off when the screen protection is triggered.

A click on Start hides the program from the taskbar and system tray, and enables the triggers to display or remove the screen protection.

The default key to trigger the protection is F12, the key to return to the previous state is F11.

The only indication that Sichtschutz is running is the process which is visible in the task manager.

Sichtschutz is fully compatible with dual-monitor systems. You can download the portable software from the developer homepage. The program requires the Microsoft .NET Framework 2.0.


© Martin Brinkmann for gHacks Technology News | Latest Tech News, Software And Tutorials, 2011. | Permalink | Add to del.icio.us, digg, facebook, reddit, twitter
Post tags: , , ,

[From Sichtschutz, Screen Protection For Your Windows Desktop]